Migrating data from OneDrive to SharePoint is where an organization proceeds to transfer all the data(files,folders) from OneDrive to SharePoint.This guide provides the necessary steps, prerequisites, and best practices for a seamless transition.
What Does “OneDrive to SharePoint Migration” Look Like?
OneDrive is a personal cloud storage service within Microsoft 365, while SharePoint is a collaborative platform designed for team-based document management. It offers advanced security, smooth workflows, and version control.
Why Are Organizations Migrating from OneDrive to SharePoint?
Content Management
OneDrive is optimized for personal file storage, while SharePoint is designed for team-based document management.
Collaboration & Workflows
Both support file sharing and version history, but SharePoint includes approval workflows, metadata management, and structured permissions.
Microsoft 365 Integration
While both integrate with Microsoft 365, SharePoint provides deeper collaboration within Teams, Power Automate, and enterprise-wide document libraries.
Prerequisites: What Should You Know Before Starting the Migration?
Access Credentials
Ensure you have valid login credentials for OneDrive and Global Admin permission for SharePoint.
Required Permissions
Verify that you have admin rights to migrate and modify data in both platforms.
Choose the Right Migration Tool
Select a migration tool that ensures a secure, and error-free data transfer.
Why Use Cloudsfer?
Cloudsfer is a trusted migration tool that facilitates OneDrive to SharePoint transfers with:
- User-friendly setup for fast migration.
- Advanced security features to protect data.
- Customizable filters for selective migration.
- Metadata and permissions transfer.
Step-by-Step Process
Step 1: Assess Data Volume in OneDrive
- Log in to OneDrive and review storage usage.
- Identify large files or redundant data for cleanup.
Step 2: Prepare SharePoint for Migration
- Organize your SharePoint site, document libraries, and folder structures.
- Ensure SharePoint has enough storage for the migration.
Step 3: Set Up Cloudsfer as the Migration Tool
1. Connect OneDrive
- Log in to Cloudsfer.
- Select OneDrive as the ‘Source’ and authenticate access.

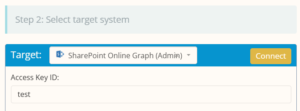
2. Connect SharePoint
- Choose SharePoint Online as the ‘Target’.
- Enter the SharePoint site URL and authenticate access.
3. Select Data to Migrate
- Use Cloudsfer’s dashboard to select files and folders for migration.
- Apply filters (file types, date) to customize the process.
Step 4: Start the Migration
- Initiate the Migration Process
Start the migration using Cloudsfer’s dashboard with a few simple clicks.
- Monitor Progress
Track the migration status through progress indicators and logs.
- Handle Errors
If any issues occur, Cloudsfer will provide error logs for troubleshooting.
Step 5: Verify and Finalize the Migration
- Validate that all files have been successfully transferred.
- Check permissions to ensure access settings match SharePoint.
- Review workflows and integrations after transition.