Migrating from Backblaze B2 to Egnyte involves transferring data between two cloud-based platforms with different focuses. This guide outlines the steps, tools, and considerations involved in moving files efficiently and securely using Cloudsfer.
What Does “Backblaze B2 to Egnyte Migration” Involve?
Backblaze B2 and Egnyte are both cloud platforms designed to manage content, but they serve distinct purposes. Backblaze B2 is known for its cost-effective, scalable object storage, widely used for backups, archives, and developer-driven workflows.
Egnyte, in contrast, is recognized for its secure content collaboration, governance features, and support for hybrid deployment environments.
Why Do Organizations Move from Backblaze B2 to Egnyte?
Shifting Business Needs
As organizations move from basic storage requirements to collaborative file management, they may seek platforms that support file sharing, structured access, and content lifecycle tools.
User Accessibility and Management
Backblaze B2 is optimized for developers and backend applications, while Egnyte is often used in environments where non-technical users need easy access to files, permissions, and collaboration features.
Compliance and Oversight
For teams that operate in regulated industries or require more visibility over content use, Egnyte offers built-in governance tools that help meet those requirements, which may extend beyond B2’s object storage scope.
Prerequisites: What You Need Before Starting
- Administrative Access:
API keys for Backblaze B2 and admin-level credentials for Egnyte.
- Content Review:
Identify and organize the data you plan to move. Archive outdated files to optimize the migration.
- Cloudsfer Account:
A valid Cloudsfer account to handle the migration between B2 and Egnyte.
Why Use Cloudsfer?
- Supports direct migration from Backblaze B2 to Egnyte
- Maintains folder structure and metadata (where applicable)
- Offers filtering by type, size, or date
- Encrypts transfers and provides detailed logs
- No local download or re-upload required
Step-by-Step Migration Process
Step 1: Assess Backblaze B2 Data
- Log in to the Backblaze B2 dashboard
- Review bucket contents and structure
- Clean up any unnecessary or outdated files
Step 2: Prepare Egnyte Environment
- Set up the folder structure where the data will be stored
- Check available storage and user roles
- Configure access permissions if applicable
Step 3: Configure Cloudsfer as Your Migration Tool
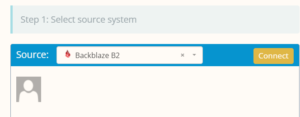
Connect Backblaze B2
- In Cloudsfer, select Backblaze B2 as the source
- Enter your Application Key ID, Secret, and bucket details
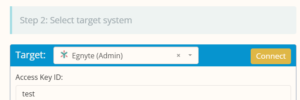
Connect Egnyte
- Select Egnyte as the target
- Authenticate and define the destination folders
Customize Migration
- Apply filters by file type, size, or modified date
- Choose whether to preserve metadata
Step 4: Run the Migration
- Launch the migration from Cloudsfer’s dashboard
- Track progress using real-time logs and indicators
- If any errors occur, Cloudsfer provides retry options
Step 5: Post-Migration Validation
- Review the migrated files in Egnyte
- Confirm folder structure and open key files
- Adjust user permissions if needed
- Notify users about the new file locations or access procedures