Migrating from Dropbox to Egnyte involves moving files, folders, and possibly user permissions between two cloud-based file management platforms. This guide outlines the steps, tools, and considerations involved in securely and efficiently completing the migration.
What Does “Dropbox to Egnyte Migration” Involve?
Dropbox and Egnyte are both cloud-based file storage and collaboration platforms. Dropbox is known for its simplicity, ease of use, and strong integration with common collaboration tools. Egnyte, on the other hand, is recognized for its focus on content governance, file control, and support for hybrid environments, which enables access to files both in the cloud and on-premises.
Why Do Organizations Move from Dropbox to Egnyte?
Governance and Access Control
Egnyte provides tools for detailed permission management, file lifecycle policies, and compliance reporting. Dropbox also supports role-based permissions and activity tracking, but Egnyte emphasizes governance for regulated industries.
Deployment Flexibility
Egnyte supports both cloud and on-premise deployment models, allowing organizations with mixed infrastructure to access files locally or remotely. Dropbox is entirely cloud-based, which can be simpler to manage but less flexible in hybrid environments.
Integration and Management
Dropbox integrates smoothly with tools like Slack, Zoom, and Google Workspace. Egnyte offers integrations with Microsoft 365, Salesforce, and other enterprise systems, along with advanced admin controls and file auditing features.
Prerequisites: What You Need Before Starting
Administrative Access
You’ll need admin-level credentials for both Dropbox and Egnyte.
Content Review
Review and organize your Dropbox files. Clean up unnecessary items to streamline the migration.
Migration Tool Selection
Why Use Cloudsfer?
- Supports direct Dropbox-to-Egnyte migrations.
- Allows selection of specific data and users.
- Preserves timestamps and metadata where applicable.
- Offers encrypted data transfer and migration reports.
Step-by-Step Migration Process
Step 1: Assess Dropbox Data
- Log in to the Dropbox Admin Console and review shared folders, user content, and team activity.
- Identify which files and folders need to be migrated.
- Consider removing or archiving old content.
Step 2: Prepare Egnyte Environment
- Set up folders and directory structure in Egnyte to align with Dropbox.
- Review available storage space and user provisioning.
- Pre-configure permissions or roles if your migration tool supports mapping.
Step 3: Configure Cloudsfer as Your Migration Tool
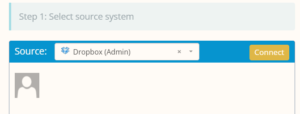
Connect Dropbox
- Log in to your migration tool and authenticate Dropbox as the source.
- Select which user data or folders to include.
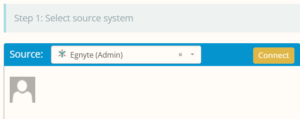
Connect Egnyte
- Authenticate with your Egnyte account and select the destination folders.
- Ensure access tokens or API scopes are correctly configured.
Customize Migration
- Apply filters if needed (e.g., file size, file types, last modified date).
- Decide whether to include metadata and permissions (if supported by the tool).
Step 4: Run the Migration
Initiate Migration
- Start the process through Cloudsfer’s dashboard.
Monitor Progress
- Track status using indicators and migration logs.
Handle Errors
- If any files fail to transfer, Cloudsfer will log the error and allow retry options.
Step 5: Post-Migration Validation
- Review migrated files in Egnyte to confirm structure and content integrity.
- Verify that key files open as expected and links (if any) work correctly.
- Manually adjust permissions if needed.
- Notify users and share any access instructions or changes.