Migrating from Egnyte to an Amazon S3-compatible storage solution involves moving structured enterprise content to a scalable object storage platform. This guide outlines the migration process using Cloudsfer, while offering a secure and customizable path to support increasing storage strategies.
What Does “Egnyte to Amazon S3-Compatible Migration” Involve?
Egnyte is a platform built for safe file collaboration, compliance, and hybrid cloud deployments. In contrast, S3-compatible storage refers to third-party services like Wasabi, Backblaze B2, or MinIO that replicate the Amazon S3 API.
A migration from Egnyte to S3-compatible storage typically includes transferring user files, preserving folder structure, and re-establishing access protocols in a new cloud environment.
Why Do Organizations Move from Egnyte to S3-Compatible Storage?
Storage Strategy Evolution
Egnyte excels in content governance, compliance, and collaborative workflows. However, some organizations shift to S3-compatible storage to gain flexibility in how data is accessed, stored, and managed across cloud-native applications.
Cost and Scalability Considerations
While Egnyte offers integrated tools as part of its platform, S3-compatible providers often provide more granular cost control, which is appealing for archiving or scaling unstructured data.
Integration and Development
Egnyte supports users with minimal technical overhead, while S3-compatible platforms cater to technical teams who need direct API access, automation, or integration with CI/CD systems.
Prerequisites: What You Need Before Starting
- Administrative Access:
Ensure Egnyte admin credentials and valid S3-compatible API credentials are available.
- Target Bucket Setup:
Set up your destination bucket with a compatible provider (e.g., Wasabi, Backblaze B2).
- Cloudsfer Account:
Sign up to manage the migration with security and filtering capabilities.
- Data Planning:
Review existing files, clean up unnecessary data, and determine the structure to replicate in the destination.
Why Use Cloudsfer?
- Supports Egnyte to S3-compatible direct transfer
- Preserves folder structure and timestamps (where applicable)
- Filters data by file type, size, or modification date
- Encrypts all transfers and provides detailed migration logs
Step-by-Step Migration Process
Step 1: Assess Egnyte Data
- Log in to Egnyte and audit the folder structure
- Identify data sets to migrate
- Archive or delete outdated files to streamline the process
Step 2: Prepare Amazon S3-Compatible Storage
- Create a target bucket (e.g., Wasabi or MinIO)
- Note down:
- Endpoint URL
- Access Key ID
- Secret Access Key
- Bucket name
- Verify storage availability and region settings
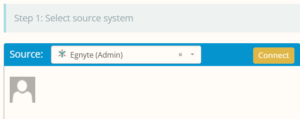
Step 3: Configure Cloudsfer as Your Migration Tool
- Log in to Cloudsfer
- Connect Egnyte: Authenticate and select folders to migrate
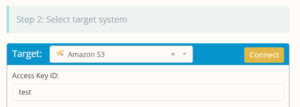
- Connect S3-Compatible Storage: Choose the target and input endpoint, keys, and bucket details
- Map Egnyte folders to S3-compatible paths
Step 4: Customize Migration
- Apply filters for specific file types, sizes, or date ranges
- Choose whether to retain metadata and folder hierarchy
- Schedule migration immediately or at a later time
Step 5: Run the Migration
- Start migration from Cloudsfer’s dashboard
- Monitor progress in real-time via logs and activity bars
- Use retry options if errors occur
Step 6: Post-Migration Validation
- Access the S3-compatible storage and verify that folders and files are correctly placed
- Test sample files for readability and integrity
- Review access settings and notify users of the new storage location