Migrating from one Google Drive account to another is essential during organizational restructuring, employee offboarding, or when consolidating Google Workspace domains. This guide provides a clear, step-by-step process to move your files while maintaining structure, permissions (where applicable), and data integrity.
What Does “Google Drive to Google Drive Migration” Look Like?
Google Drive is a cloud-based file storage solution that supports personal and enterprise use. A migration between two Google Drives can involve users within the same organization or across different Google Workspace domains. This process includes copying or transferring folders, files, and ownership from a source account to a destination account.
Why Are Organizations Migrating from Google Drive to Google Drive?
User Offboarding
When employees leave an organization, their data may need to be transferred to a new owner or central archive.
Domain Consolidation
Migrations are necessary when combining multiple Google Workspace domains or accounts under a single umbrella.
Access Control Realignment
To ensure proper ownership, control, and ongoing access to project data by the right users or teams.
Prerequisites: What Should You Know Before Starting the Migration?
Access Credentials
You’ll need login access or admin-level credentials for both the source and destination Google accounts (or Google Workspace users).
Required Permissions
Ensure that:
- You can access and download content from the source account.
- You have edit/upload access to the destination Google Drive.
Choose the Right Migration Tool
You’ll need a tool that can handle large-scale, secure data transfers and retain permissions and metadata during the process.
Why Use Cloudsfer?
Cloudsfer provides a seamless, secure way to migrate your files with:
- User-friendly steps for quick migration.
- Advanced security features to protect sensitive files.
- Customizable filters to migrate only selected data.
- Preservation of metadata and permissions during transfer.
Step-by-Step Process
Step 1: Assess Data in the Source Google Drive
- Log in to the source Google Drive.
- Identify total storage used and organize files into folders.
- Remove unnecessary files and ensure shared files are properly owned by the source account
Step 2: Prepare the Destination Google Drive
- Log in to the target Google Drive account.
- Ensure enough storage is available for the incoming data.
- Set up folders if needed to mirror the source structure.
Step 3: Set Up Cloudsfer as Your Migration Tool
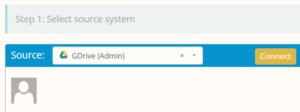
- Connect the Source Google Drive
- Log in to Cloudsfer.
- Choose Google Drive as your ‘Source’.
- Authenticate using the source Google account.
- Connect the Destination Google Drive
- Select Google Drive (or Google Workspace) as your target.
- Authenticate using the destination account credentials.
- Select Data to Migrate
- Use Cloudsfer’s interface to select specific folders/files.
- Apply optional filters by file type, modification date, or size.
Step 4: Start the Migration
- Initiate the Migration Process
Start the migration using Cloudsfer’s dashboard with a few simple clicks.
- Monitor Progress
Track the migration status through progress indicators and logs.
- Handle Errors
If any issues occur, Cloudsfer will provide error logs for troubleshooting.
Step 5: Verify and Finalize the Migration
- Confirm that all expected files and folders appear in the destination Google Drive.
- Check that folder structures are preserved.
- Verify access permissions and sharing settings where applicable.
- Contact Cloudsfer support if any discrepancies occur.