Migrating data between SharePoint Online environments often occurs during mergers, acquisitions, rebranding, or restructuring. This guide outlines the key steps to securely and efficiently move content between SharePoint Online tenants or sites.
What Does “SharePoint Online to SharePoint Online Migration” Look Like?
This migration involves transferring content, such as document libraries, lists, site pages, and metadata, from one SharePoint Online tenant or site collection to another. The goal is to retain structure, permissions, and content integrity while minimizin
Why Are Organizations Migrating Between SharePoint Online Sites?
Tenant Mergers or Splits
When companies merge or spin off, consolidating or separating SharePoint content becomes necessary.
Reorganization or Restructuring
A certain department may need to redesign site architecture for better navigation, performance, or governance.
Branding or Compliance Changes
Organizations may rebuild sites to meet new branding, security, or compliance standards.
Prerequisites: What Should You Know Before Starting?
Access Credentials
Admin access to both source and target SharePoint Online tenants or site collections.
Permissions
Ensure you have full control over all site content to be migrated and the necessary roles in the target environment.
Choose the Right Migration Tool
Why Use Cloudsfer?
- Supports direct SharePoint-to-SharePoint migrations.
- Allows selection of specific data and users.
- Preserves timestamps and metadata where applicable.
- Offers encrypted data transfer and migration reports.
Step-by-Step Process
Step 1: Inventory Existing Content
- Review lists, libraries, pages, workflows, and permissions in the source site.
- Remove outdated or unused items.
Step 2: Prepare the Target SharePoint Site
- Create destination sites, libraries, and a structure to mirror the source.
- Assign appropriate permissions.
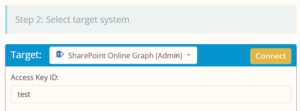
Step 3: Set Up Cloudsfer as Your Migration Tool
- Connect both the source and destination to SharePoint Online environments.
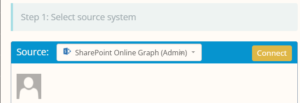
- Authenticate using admin credentials or app registrations as required.
Step 4: Select and Transfer Content
- Choose which libraries, lists, or entire sites to migrate.
- Apply filters (e.g., by date or content type) if necessary.
Step 5: Run the Migration
- Start the process using the migration tool.
- Monitor progress and review error logs if issues arise.
Step 6: Post-Migration Validation
- Confirm all content and structure have transferred correctly.
- Test document access, workflows, and links.
Get started here or contact us