
Did you know that about 20% of data migrations fail to deliver accurate results which leads to potential data loss and business disruptions? However, migrating your data to Dropbox can be simple and effortless with the right tools. That is where the Cloudsfer Dropbox Migration Tool comes in. It is designed to help you with a seamless transition not only to but also from your cloud systems to Dropbox. Follow this step-by-step guide to ensure a smooth migration.
Step 0 : Assess Your Data for Dropbox Migration
Before migrating to Dropbox, it’s essential to thoroughly assess your data. Start by checking the size of each file, especially if you’re transitioning large amounts of data. You can quickly check this by following these steps:
1. Log in to dropbox.com and click your avatar (profile picture or initials).
2. Select “Manage Account” and then “Subscriptions” on the left sidebar.
3. Review your “Personal Dropbox Space” bar, which shows the combination of used and unused space for both regular and shared files.
This would provide adequate space to manage your migration without getting caught halfway. Afterwards, you can move to the next step once you’re sure your Dropbox account has enough space for the migration.
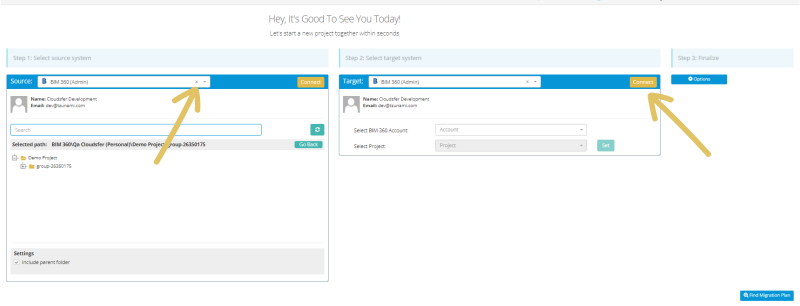
Step 1: Select Your Source
Start by selecting the source of your data. Cloudsfer supports migrations from a variety of cloud storage services, like Google Drive, OneDrive, Box, and more. Let’s take two case scenarios. For instance if you are;
Migrating into Dropbox
1. Log into Cloudsfer.
2. Choose the cloud service where your files are currently stored (e.g., Google Drive, OneDrive).
3. Select “Dropbox” as your target destination.
Migrating from Dropbox
1. Log into Cloudsfer.
2. Add Dropbox as your source.
3. Select your desired target cloud service.
Here is a visual representation:
Step 2: Start the Migration
Once both your source and destination are set, you should now initiate the migration. This tool will transfer your files from the selected source to Dropbox. It preserves your folder structure and metadata so your files are organized in Dropbox as they were in the original cloud service.
During the dropbox migration, you can monitor the progress in real time using Cloudsfer’s dashboard. For instance, the dashboard provides live updates, and automated alerts to notify you of any issues that arose. Detailed progress reports are also generated to show how the migration is progressing and if any errors need addressing after you have performed dropbox migration.
Additional Tips for a Smooth Migration
– Verify Backup Integrity: Before starting data migration, it’s essential to back up your files. By doing so, you are minimizing the risk of data loss during the migration process.
– Check Permissions: Confirm that all necessary permissions are set correctly in both your source and destination accounts to avoid any issues during the migration.
– Monitor Progress: For this, you can leverage Cloudsfer’s real-time monitoring reports to keep track of the migration and address any issues that may arise.
Post-Migration
After your dropbox migration, check all files to make sure it has been transferred correctly to Dropbox. Also, verify that your files and folders are accessible and intact. You can also download every informative migration report in Cloudsfer, where you can review the migration process to ensure everything has been transferred as expected.
Summing Up
Considering migration to or from Dropbox? We believe this guide has provided you with the essentials to make the process as simple as possible. For help with the next steps, Cloudsfer Support is ready to assist. Feel free to reach out at [email protected].